Monday, June 29, 2009

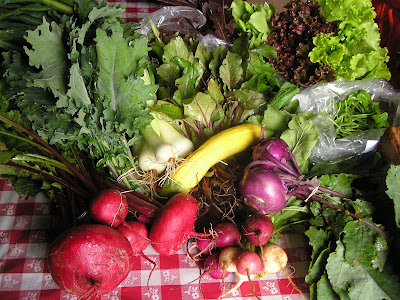
Harvest #6-B


We're already into the 6th week of the CSA season. It's amazing for me to think that we're a 1/3 of the way into it.

This weeks Worms Voice- our CSA newsletter

This week the fields are offering:
Lettuce Mix
Head Lettuce--love it while it's here!
Chard/Kale
Beets and their Greens
Turnips and their Greens
Radishes
Kohlrabi
Spring Onions
Garlic Scapes--this may be the last of them!
Summer Squash
Cucumbers

Don't miss out!
Harvest #6-BSocialTwist Tell-a-Friend

Wednesday, June 24, 2009

What the Fields are Offering for Week 5-A


Welcome to Week 5-A of the CSA! We're welcoming groups Arugula and Asparagus into the barn this week. We've been happy to offer you lots of lovely greens thus far, but it's starting to get warm, which means you will see them begin to trail off. In this week's share though, they are strongly represented!

This weeks Worms Voice- our CSA newsletter.

In your harvest basket you'll find:

Lettuce Mix
Bunched Greens
Head Lettuce
Kohlrabi or Radishes
Turnips
Baby Beets/Beet Greens
Garlic Scapes
Summer Squash/Zucchini
Spring Onions

And don't miss the new wildflowers, the dill, or the cilantro in the pick your own!
What the Fields are Offering for Week 5-ASocialTwist Tell-a-Friend

Wednesday, June 17, 2009

Harvest #4-B

Click here for this weeks Worms Voice Newsletter
(and we've posted pdf's of the back issues with each harvest post too)

It's starting to feel like Harvest Day = Rain Day. Ugh. It gets a little hard to motivate the crew to head out into the fields and slog through the mud and spend the next 4 hours getting wet. But never fear, the job is done and it was a big one. Coming your way this week....

Lettuce Mix
Arugula
Braising Mix
Kale or Collards or Chard
Easter Egg Radishes
Baby Beets and their Greens
Turnips and their Greens
Spring Onions
Garlic Scapes
Summer Squash or Zucchini *It's here!
Head Lettuce or Kohlrabi
Snow Peas are a PYO item--I know it's weedy

Reminder* If it says OR then it's only one of those items, not all of them. Choices!
Harvest #4-BSocialTwist Tell-a-Friend

Monday, June 15, 2009

Cluck Cluck!

As you may have seen on our facebook page, we're thinking about getting chickens here on the farm. Well, really, we're planning on getting chickens, but right now we're in that lovely stage where we're dreaming big about what our chicken operation could look like. There are a lot of possibilities, and we're pretty excited about the benefits of raising chickens: beautiful animals on the farm, nutritious eggs to eat, highly efficient pest control, and an excellent, free, and natural source of fertilizer. We haven't decided yet on what exact breeds we'll be raising, or even if we'll get chickens this year (keep your fingers crossed), but we're moving forward with our plans for a coop, and the planning is pretty fun!
Here's where we are thus far:
We have an old wooden trailer on the property, the kind you'd hitch to the back of a tractor for hayrides and such. Currently it's just hanging out, and so our plan is to convert it into a chicken coop on wheels. You may be familiar with the Egg Mobiles or Chicken Tractors used by Joel Salatin at Polyface farm. Our setup will be somewhat similar, though our rotation of grazing animals will be significantly less complex since we're only raising chickens! The idea though is that you can move the coop about the farm, allowing the chickens new grass to run in every couple of days. This keeps the grass healthy, distributes fertilizer (waste) evenly, and spreads out your pest managers across the farm.
We're constrained by the size of the trailer as to how many chickens we host on our property, but fortunately the trailer is pretty spacious, so we'll be able to have about 40 chickens. The birds need 2 to 3 square feet per chicken indoors, and the trailer's about 144 sq ft.

We initially considered only raising hens on the farm since we know that roosters are noisy by nature and can be rather aggressive. We want the growers to be able to interact with the chickens comfortably, so having a potentially aggressive bird on the premises didn't seem like the best idea. However, after we paid a visit to Poplar Springs, a local animal sanctuary that calls itself home to many a happy chicken, we learned that roosters are an important piece in the life of a healthy flock. Roosters, it turns out, are great watch dogs. They're far more likely to be keeping an eye on the sky and the perimeter of the run and thus looking out for predators. And their natural noisiness, though perhaps irritating to the neighbors, acts as a highly audible distress signal to their human caretakers. When the rooster starts squawking in the afternoon, you know it's time to run to the chicken coop!
We currently stockpiling building supplies for the coop, and are hoping to have a chicken coop raising day to get the structure on the ground. We're doing this on a very tight budget, so if you have any building supplies that you'd like to get off your hands, or if you feeling like donating to the "chickie bank," we'd greatly appreciate your support! We're trying to do as much as we can with re-purposed materials, but we're still going to need to purchase some basics, such as 2x4s, 1/2 inch hardware cloth, and pvc roofing. We have plans though to save on bedding costs, by cutting and drying our own grass on the farm to use as straw in the coop. We'll see how that goes.

The photos here are from our lovely trip to Poplar Springs, where you can see they keep some very lucky poultry. We'll keep you in the loop as our chicken plans take flight!

Cluck Cluck!SocialTwist Tell-a-Friend

Wednesday, June 10, 2009

A Special Visitor


Just as I finished posting our harvest for this week, I heard a little rustling from the shelves where we keep some of our seeds. I thought it might be a mouse that had somehow defied gravity and climbed to the top of the bookcase to snack on the kale seeds, but no, turned out it was our special friend, coming out to say good morning!
Just dropping in to say hello! Looks like a black rat snake to me. Hopefully she made a meal of any mice that might have gone up there to snack!
A Special VisitorSocialTwist Tell-a-Friend

What's Fresh for Week 3-A

Welcome to Week Three of the CSA! This is an A week, which means groups Arugula (Wednesday) and Asparagus (Saturday) are picking up.

This week in your share you'll find:
Spring Onions
Easter Egg Radishes
Arugula
Lettuce Mix
Garlic Scapes
Your choice of Collards, Kale, or Swiss Chard

link to Worms Voice CSA newsletter

Nasturtiums
Pronounced nuh-STER-shuhm, this delightful and completely edible flower can be found in abundance in our pick your own (PYO) this week! All parts of the nasturtium plant are edible, except for the roots, and the young leaves, stems and flowers have a peppery flavor. They are lovely tossed in salads and add a beautiful color to a flavored lemon butter. Consider adding easy to grow nasturtiums to your garden at home- edible landscaping!
We are including a few recipes for nasturtiums below, so take a handful home to play with this week.

Nasturtium-Lemon Butter
This butter has a light lemon flavor lightly accented with peppery nasturtiums. Try it with fish, chicken, broccoli, and asparagus. It is also excellent on white bread for just a hint of peppery citrus. Substitute another herb such as dill or cilantro for the nasturtiums for a different take on the butter.
• 1/2 cup unsalted butter at room temperature
• 2 teaspoons grated lemon peel
• 1 tablespoon lemon juice
• 3 tablespoons finely chopped nasturtium blossoms

Mix all of the ingredients well until smooth and well blended. Refrigerate or freeze until ready to serve. Makes 3/4 cup flavored butter.

Nasturtium and Strawberry Salad
This salad calls for nasturtium vinegar which has a lengthy production process. Use the vinegar to add flavor to lots of dishes and the effort will be worthwhile.
For the nasturtium vinegar:
• 3 cups nasturtium flowers, (1 cup a week) washed and dried
• 2 cups white wine or Champagne vinegar

Lightly crush 1 cup of nasturtium blossoms with the back of a spoon and combine with the vinegar in a glass jar. Cover with a layer of plastic wrap and screw on a tight-fitting lid. Set aside in a moderately warm place (next to the stove, for example) for about three weeks, straining and replacing the flowers with a freshly crushed batch once a week. When the vinegar is ready, strain the flowers out and store the jar in a cool, dark place. Makes 2 cups.
Variation: Add a whole clove of garlic when you begin the steeping process.

For the Salad:
• ¼ c nasturtium vinegar
• 1 Tbsp balsamic vinegar
• 1 Tbsp honey
• 1 tsp Dijon mustard
• salt
• freshly ground black pepper
• ½ c extra virgin olive oil
• 1/3 c chopped fresh nasturtium blossoms
• 8 c mixed greens, washed, dried and torn into bite sized pieces
• 1 c small strawberries, quartered
• whole pansies, nasturtiums, chrysanthemum, or other edible blossoms for garnish

In a medium bowl, whisk together the vinegars, honey, mustard, and salt and pepper to taste. Slowly drizzle in the olive oil, whisking constantly, until the dressing has emulsified. In a large bowl, toss the dressing with the greens, strawberries and fresh flowers and serve immediately.

Butter Braised Radishes & Greens
Unless you love fresh radishes sliced on all your salads, you may be wondering what to do with another bunch this week. We’d like to suggest resurrecting a recipe from last season and braising your radishes in a bit of butter. This method takes some of the bite out of the radishes and gives a nice, turnip-like texture. Experiment with the dish- adding thinly sliced garlic scapes infuses the dish with another dimension of flavor, and any chopped greens (collards, kale, braising mix, chard) aside from the radish greens, which are not particularly edible, can be added with the radishes for some color.
From the Washington Post

• 2 tablespoons unsalted butter
• 1 3- to 4-ounce spring onion, cut into 1/4-inch dice, tough dark-green top removed (may substitute sweet onion)
• 1 pound (two 1/2-pound bunches) radishes, cleaned, green tops removed, stem ends trimmed; small ones left whole, medium ones cut in half, large ones cut into quarters
• Salt
• Freshly ground black pepper
• Pinch sugar
• 1/2 cup water

In a pan large enough to hold the radishes without crowding, melt the butter over medium-high heat; allow it to begin to brown but not burn. Add the diced onion and reduce the heat to medium. Cook, stirring, for about 3 minutes, until the onion softens.

Add the radishes, salt and pepper to taste, the sugar and the water, stirring to combine. Increase the heat to high and bring just to a boil, then cover and reduce the heat to low. Cook for about 20 minutes, until tender.

Uncover, increase the heat to high and bring back to a boil; cook for about 4 minutes, until almost all the liquid has evaporated. Serve hot or warm.
What's Fresh for Week 3-ASocialTwist Tell-a-Friend

Sunday, June 07, 2009

Baltimore Checkerspot Habitat Restoration


This week an excellent group of volunteers came and helped with a wetland habitat restoration project in the wetlands abutting the farm. Led by Denise Gibbs, a MNCPPC Naturalist and local authority on the Baltimore Checkerspot, the group helped execute a project designed to encourage the reproduction of the Baltimore Checkerspot Butterfly, the
Maryland State butterfly which has been in dramatic decline over the past 20-30 years.

Our project entailed planting White Turtlehead, the host plant of the Baltimore Checkerspot, in small fenced in areas in the wetlands. Stands of White Turtlehead have been increasingly hard for the butterfly to find because White Turtlehead is a favorite snack of White Tailed Deer which are in abundance in the Maryland/DC Metro area.

While deer have always enjoyed snacking on White Turtlehead their interest in the plant has only become an issue for the Baltimore Checkerspot recently. As development has encroached outside of the beltway the deer have seen their habitat shrink and they have in turn found themselves pushed into the only areas where housing and shopping centers are not being built: the wetlands. White Turtlehead naturally grows in wetland areas and is the only plant that the Baltimore larvae will eat. With more deer grazing less land, and in particular grazing the wetlands, White Turtlehead has become more and more difficult to find. Without their host plant to lay their eggs on and the larvae to eat, the Baltimore buttterfly has gone into decline in Maryland.

With the help of our enthusiastic volunteers we were able to plant 135 White Turtlehead plants in deer fenced areas. We had put in numerous plants last year in various areas in the wetlands, but found that the White Turtlehead really took off in one particular spot, and so we concentrated our efforts close by. It's our hope that we'll see one large continuous stand of White Turtlehead develop so it can feed a large population of larvae. We'll keep you updated on any BaltimoreCheckerspot spottings as the season evolves!

Baltimore Checkerspot Habitat RestorationSocialTwist Tell-a-Friend

Wednesday, June 03, 2009

The Worm's Voice, Week 2B

Recipes from The Worm's Voice for this week. Enjoy!
Click here for a PDF of this week's newsletter

Garlic Scape Pesto from MaryJane Butters

¼ pound (8-10) garlic scapes 1 cup grated Parmesan cheese
½ cup olive oil 3 tablespoons fresh lime juice

1. Puree garlic scapes and olive oil in a blender or food processor or blender until smooth.
2. Stir in Parmesan cheese and lime juice and salt to taste.

Garlic Scape and Lovage Finadene Sauce

This sauce, from MaryJane Butters, is good as a dip, a condiment, for meats and vegetables, and added to salads.

½ cup fresh lime juice (about 3 limes)
1/8 cup cold water
1 teaspoon salt
2 scallions or 1 small spring onion, chopped
3 tablespoons garlic scapes chopped
1 fresh jalapeno, seeded and minced
1 tablespoon fresh lovage, chopped

1. Combine lime juice, water, and salt in a non-metal mixing bowl and wisk until the salt dissolves.
2. Stir in scallions/onions, garlic scapes, jalapeno and lovage. Refrigerate for up to 1 week. Yeilds 1 cup.


Roasted Garlic Scapes from MaryJane Butters

8 whole garlic scapes & 1 tablespoon olive oil

Preheat 350F. Place garlic scapes on foil and drizzle with olive oil. Bake for 20 mintues, or until scapes are softened. Yeilds 2 servings.


Crustless Spinach Quiche (Meal for 4)
Adapted from Cabot Vermont Recipe database

This is a great basic recipe- you can add just about any
type of vegetables to the mix to create your own dish.

2 tsp canola oil
1 ½ red onions (including green stems) thinly sliced
2 garlic scapes, thinly sliced
4 cups fresh spinach, chopped
1 ½ cups grated Cabot 75% Reduced Fat Cheddar (about 6 ounces)
6 large egg whites
1 large egg
1/3 cup non-fat cottage cheese
¼ tsp ground red pepper (cayenne)
1/8 tsp salt
1/8 tsp grated nutmeg

1. Preheat oven to 375 degrees F. Coat 9-inch pie plate with cooking spray; set aside.
2. In nonstick skillet over low-medium heat, cook spinach until wilted; drain and set aside.
3. In a separate skillet over medium-high heat, heat oil. Add onion (and/or garlic scapes) and cook, stirring for 5 minutes or until translucent. Add spinach and stir until moisture has evaporated, about 3 minutes longer.
4. Sprinkle cheese evenly in prepared pie plate. Top with spinach mixture.
5. In medium bowl, whisk together egg whites, egg, cottage cheese, red pepper, salt, and nutmeg. Pour egg mixture evenly over spinach.
6. Bake for 30 – 40 minutes, or until set. Let stand for 5 minutes, then cut into wedges and serve.
The Worm's Voice, Week 2BSocialTwist Tell-a-Friend

Tuesday, June 02, 2009

Harvest 2-B

Michelle, will add more fun here in a moment. But for those anxious to know what's coming your way this week. Here's what we got:
Baby Collards or Kale
Salad Mix
Spinach
Radishes
Spring Onions
Garlic Scapes
Butler's Strawberries
Surprise Bonus to be revealed at pick up!
Harvest 2-BSocialTwist Tell-a-Friend

Monday, June 01, 2009

A great spring picture!

a GREAT spring picture of everyone- a little damp and a lot happy! We love garlic scapes!
A great spring picture!SocialTwist Tell-a-Friend